Let's be honest, buying new tractor weights can severely impact your budget. But what if you could significantly improve your tractor's grip without breaking the bank? Building your own DIY tractor weights is a surprisingly simple and cost-effective way to boost your farm's efficiency. This guide details three popular methods, empowering you to choose the best option for your tractor and skillset. For more information on 3-point hitch attachments, check out this helpful resource: 3-point hitch info.
Safety First: Prioritizing Your Well-being
Before you begin, prioritize safety. We're dealing with heavy materials and potentially hazardous tools. This isn't a game; your safety is paramount. Essential safety equipment includes: safety glasses, sturdy work gloves, and solid work boots. If welding is involved (as in the scrap metal method), a proper welding mask and protective clothing are absolutely non-negotiable. A well-stocked first-aid kit should be readily accessible. Consider working with a partner; two sets of eyes and hands are always better than one when handling heavy materials. Remember, safety isn't optional – it's essential.
Choosing Your DIY Weight Method: Three Proven Approaches
Now, let's explore three popular methods for creating DIY tractor weights, each with its own advantages, disadvantages, and specific safety considerations.
1. The Simple Sand/Gravel Method
- Materials: Several heavy-duty buckets (5-gallon or larger), sand or gravel, a shovel, and a funnel (optional).
- Tools: None beyond the materials listed, and appropriate lifting assistance to handle full buckets.
- Instructions:
- Clean the buckets thoroughly.
- Fill the buckets with sand or gravel, compacting the material firmly to minimize shifting.
- Secure the lids tightly to prevent spillage.
- Pros: Extremely inexpensive and uses readily available materials. Simple to construct.
- Cons: Low durability; prone to leaks and breakage. Not suitable for heavy-duty applications. Weight is dispersed, less concentrated than other options.
- Safety Concerns: Exercise caution when lifting full buckets; they become very heavy.
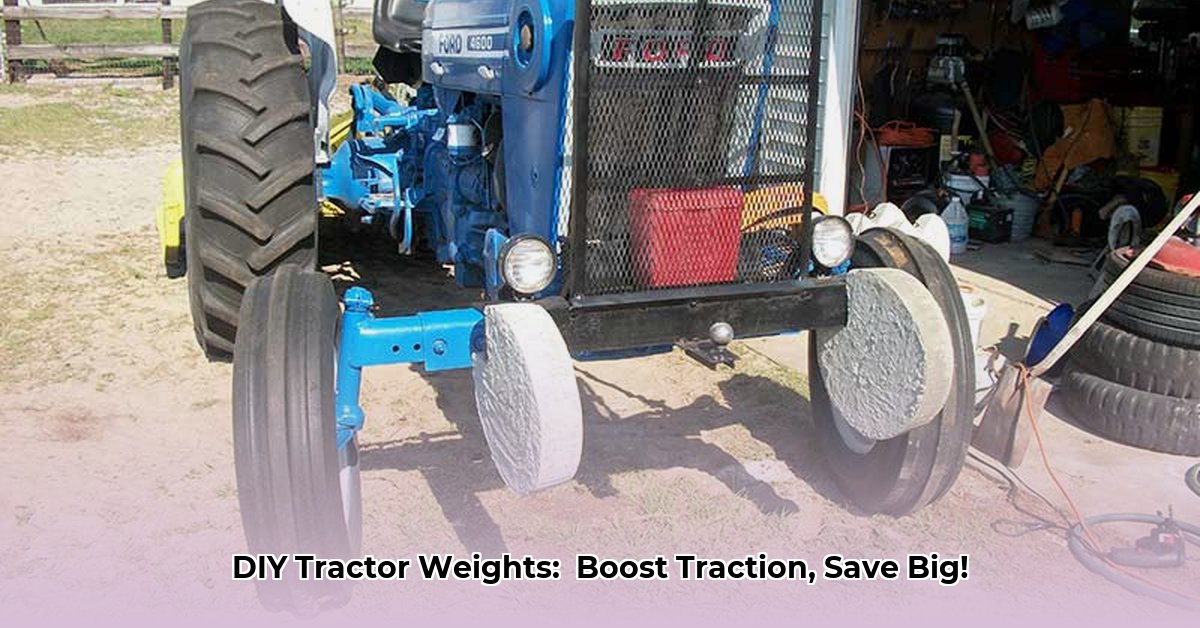
2. The Durable Concrete Ballast Box Method
- Materials: Pressure-treated lumber (for longevity), concrete mix, a release agent (to prevent sticking), wood sealant (all-weather type).
- Tools: Measuring tape, saw, drill, mixing tools, wheelbarrow, shovel, safety glasses.
- Instructions:
- Construct sturdy wooden boxes (dimensions depend on your tractor's needs and desired weight). Design for strength to withstand the concrete's weight.
- Apply all-weather wood sealant to protect against the elements, extending the box's lifespan.
- Mix the concrete according to package instructions; precise proportions are critical.
- Pour the concrete into the boxes and allow complete curing (24-48 hours minimum, potentially longer depending on weather and concrete type).
- Pros: Durable, long-lasting, relatively inexpensive. Shape and size are customizable within structural limits.
- Cons: More labor-intensive; requires curing time. Relatively large & heavy to handle.
- Safety Concerns: Wear safety glasses and gloves when working with concrete; it's irritating to skin and eyes. Consider a dust mask for dusty mixes.
3. The Heavy-Duty Scrap Metal Method
- Materials: Heavy scrap metal (old rims, steel plates, etc.), welding equipment (essential). Clean the metal thoroughly; remove rust and sharp edges.
- Tools: Welding machine, grinder, metal cutting tools (as required), appropriate safety gear.
- Instructions:
- Cut, grind, and weld metal pieces (if necessary) to achieve desired weight and shape. Welding creates superior durability.
- Smooth any rough edges or sharp points to prevent injuries.
- Pros: Extremely durable; long lifespan. Uses recycled materials, reducing environmental impact. Highly customizable.
- Cons: Requires welding skills (or access to a welder), more preparation, and specialized tools. Can be expensive if you need to procure the metal.
- Safety Concerns: Welding is inherently risky. Utilize all necessary safety gear: welding mask, gloves, and protective clothing. Ensure adequate ventilation.
Securing Weights to Your Tractor: A Critical Step
Attaching your homemade weights requires care. Consult your tractor's owner's manual for recommended attachment points. Use heavy-duty chains or straps rated for the weight you're adding. Always double- and even triple-check connections before operating the tractor. A loose weight in motion is extremely dangerous.
Maintenance and Troubleshooting: Keeping Weights Functional
Regularly inspect your weights for damage or wear. Sand/gravel bags might require refilling or replacement. Concrete boxes should be checked for cracks. Metal weights may need occasional cleaning or rust removal. Addressing issues promptly prevents accidents and extends the life of your weights.
Conclusion: Empower Your Farming with DIY Solutions
Building your own tractor weights offers substantial cost savings and empowers you to customize solutions for your specific needs. Remember to always prioritize safety and consult your tractor's manual. Share your experiences and modifications; collective knowledge enhances our ability to develop better solutions. Let's build a stronger, more sustainable future together, one DIY tractor weight at a time!